What’s Involved?
When purchasing an anilox roll, not having the right anilox roller specifications can cause real problems for you down the road. Simply understanding that an anilox is made up of thousands of microscopic ink-carrying cells is not enough. It is also necessary to have a basic understanding of the characteristics of the cells and their impact on ink transfer. The following information will help you avoid unnecessary problems caused by inaccurate anilox roller specifications when ordering.
What To Consider
There are three main cell characteristics important to understanding anilox roller specifications:
- The angle of the cells (60°, 45°, 30°, etc.)
- The carrying capacity of the cell (or cell volume)
- The number of cells per linear inch (or line screen)
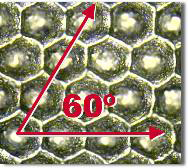
Angle of the Cells
Other than random patterns, anilox cell angles can include the 60° hex pattern, the 30° hex pattern, and the 45° diamond pattern (as shown below).
![]()
Today, since its introduction by Harper in 1989, the 60° hex pattern is the world standard for flexo printing for these reasons:
- The cells can be nested more tightly together, allowing for approximately 15% more cells in a given area.
- The post areas are eliminated due to the placement of the cells during laser engraving.
- The cells can be shallower while still releasing the same amount of ink because more cells fit into a square inch area.
- Channeling is avoided (as compared to the 30°) because the straight side of the cell wall is not positioned horizontally.
- This pattern is most easily reproducible from a manufacturing standpoint; therefore, you will see greater consistency from roll to roll.
45° and 30° patterns may be preferable in non-printing flexo applications (such as coatings, laminations, and specialty printing), but generally are not recommended for general flexo printing applications.
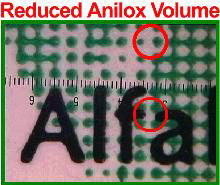
Anilox Roll Volume
The amount of ink that is transferred from a cell depends upon the carrying capacity of the cell or the cell’s volume. Remember, you print with a wet and fluid film of ink and it is important to keep in mind that you want to print with the thinnest ink film possible. Thinner films of wet ink are easier to control, reduce dot gain, and increase graphic capability.
As shown in the following graphic, dot gain is decreased with thinner ink films, simply because there is less ink to transfer from the printing plate dot.
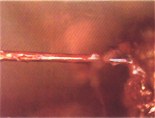
We are dealing with very small measurements and every micron is critical. How big is a micron?
A human hair is approximately 70 microns in diameter.
As stated before, you can use a lower volume anilox roll with a 60° cell because more cells fit into a square inch in this configuration. However, a cell with too small of a volume will cause ink to dry before it can be transferred unless there are sufficient drying inhibitors used. The goal is to specify an anilox roll that will deliver the color strength and densities needed with the thinnest ink film possible.
As a good rule of thumb, Harper recommends a cell whose depth is between 23% to 33% of the cell’s opening.
For example, if the opening of a cell is 100 microns, the depth of that cell should be between 23 and 33 microns.
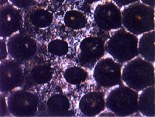
Disadvantages of deep cells (>33% depth to opening ratio):
- Ink will not release efficiently
- Difficult to clean
- Creates rough cell walls
- Extremely difficult to make consistent and predictable engravings.
Example of deep cell (50% depth to opening ratio)
![]()
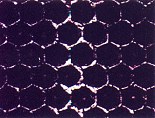
Disadvantages of shallow cells (‹23% depth to opening ratio):
- Creates rough cell cavity
- Extremely difficult to make consistent with predictable engravings
Example of shallow cell (15% depth to opening ratio)
![]()
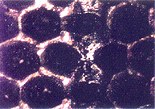
Advantages of bowl shaped cells (23% – 33% depth to opening ratio):
- Uniform cell size and shape
- Smooth glazed cell lining for efficient ink release
- Shallow angle for easy ink release
- Smooth, thin cell walls
- Possible to make consistent and predictable engravings
Example of bowl-shaped cell (28% depth to opening ratio)
![]()
Remember, when using a lower volume anilox roll, less ink is transferred to the substrate. That is a good thing. However, you still need to achieve acceptable densities from your inks.
This is the point where you must evaluate the ink you’re using. If you are not getting adequate color strength, you may need to re-think your current ink choice or talk to your ink supplier to see if they have a solution. Higher pigment inks are available and ink manufacturers have responded to the demand for these inks. Though they may cost a bit more in the beginning, improved graphics more than offset the cost. Also, because you are transferring less ink, handling less ink, and wasting less ink, you will purchase less ink.
Reduced VOC emissions are another benefit of using lower volume anilox rolls. It’s the same concept: less ink gives off less VOC emissions. It’s that simple.
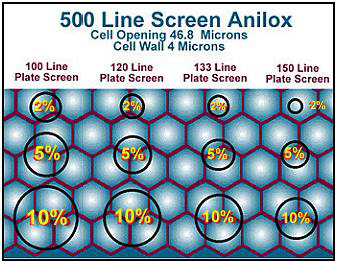
Line Screen
Line screen (or the number of cells per linear inch) is the third major component to understand when specifying an anilox roll. Line screen is chosen in direct correlation to anilox volume.
For example, an anilox volume of 3.2 BCMs, requires a line screen of approximately 500. If an anilox volume of 3.2 BCM was engraved at 1000 line screen, cells would be much too deep. In correlation, a 3.2 BCM anilox at 120 line screen anilox would result in cells being much too shallow.
With increased ink strength and lower anilox volumes, higher line screen anilox rolls can now be used. These higher line screen rolls give printers the opportunity to reach for higher graphics with finer vignettes, line and type, and process work. Following is a rough outline of printing applications matched with appropriate line screens and cell volumes:
Application
Optimizing Research
After you understand the basic characteristics of these three, you must determine which combination of anilox cell pattern, volume and line screen will work for your application.
The best way to do this is through banded roll testing.
A banded roll contains actual bands of different line screen and volume combinations. This test helps determine the correct line screen and volume combination for printing the thinnest ink film possible and still delivering the color strength you need.
Again, knowledge of the characteristics of anilox cells and their impact on ink transfer is vital to your flexo reproduction capabilities.
In review, you need a basic understanding of:
- The angle of the cells
- The carrying capacity of the cell (or cell volume)
- The number of cells per linear inch (or line screen)
By taking the time to understand these three important components of anilox roller specifications, you can increase your graphic capabilities and save time, money, and energy in the future.
| Application | Appropriate Anilox Line Screen | Appropriate Anilox Volume |
| Heavy line and solids Line and type Vignettes Process |
180 – 330 200 – 400 360 – 500 500 – 1200 |
8 – 4 BCMs 7.5 – 3.5 BCMs 4.7 – 2.8 BCMs 3.2 – 1.0 BCMs |